 MORPHO
1. Formulation of the design question
Morpho explores alternatives from a parametric model you create in Grasshopper. Start with a question you can investigate: how does a truss change as its rise, depth and subdivision vary? Which combinations meet your performance requirements while preserving the spatial qualities you value?
You will need Rhino 7 or 8, Grasshopper, a working definition, and a local output folder. Connect your own geometry and analysis tools. Morpho generates parameters, records results and helps you compare them; numerical outputs come from the model and analysis you supply.
A useful first study: choose two or three inputs and a small iteration limit. Give every input slider and recorded output a clear, unique nickname. Check a complete save-and-view cycle before increasing the number of alternatives.
2. Install Morpho 2.1
- Download the macOS or Windows package and extract the ZIP.
- Open Morpho Setup. Choose automatic installation, or select the Rhino versions and locations yourself.
- Click Install Morpho. Save your work if Rhino asks to close; installation continues after Rhino closes.
- Reopen Rhino and Grasshopper. Look for the Morpho tab.
Setup installs for your user account, detects Rhino 7 and 8, and backs up existing Morpho files before replacement. The package also includes ready-to-copy manual installation folders. Your design projects remain in their own folders.
| Platform | Requirements and viewer behavior |
|---|---|
| macOS | Intel or Apple Silicon, with an operating system supported by your Rhino version. Rhino 7 uses Rosetta on Apple Silicon. The Visualizer opens in your browser. |
| Windows | 64-bit Intel or AMD; .NET Framework 4.8 for setup. Rhino 8 using modern .NET opens the embedded Visualizer. Rhino 7 and Rhino 8 in .NET Framework mode use the browser. |
The setup applications are unsigned. Follow the included installation instructions for first-open prompts and manual installation. A Rhino installation is required; it is not included with Morpho.
3. Connect your first definition
- Directory: set the output folder and project name. Connect its output to Gene Generator and Save to Population.
- Number sliders: name each slider and set its minimum, maximum and precision. Connect the sliders directly to Gene Generator’s Intervals input.
- Design inputs: connect Gene Generator’s Genes output to the corresponding inputs in your parametric model.
- Data Aggregator: connect Genes with Names to Inputs. Connect each named, single numerical performance value to Outputs.
- Save to Population: connect Aggregated Data and the same Directory. Keep Enabled false while setting up the definition.
- Parameters: optionally connect Mutation Probability and Spread Factor through the Parameters component to Gene Generator’s Algorithm Parameters input.
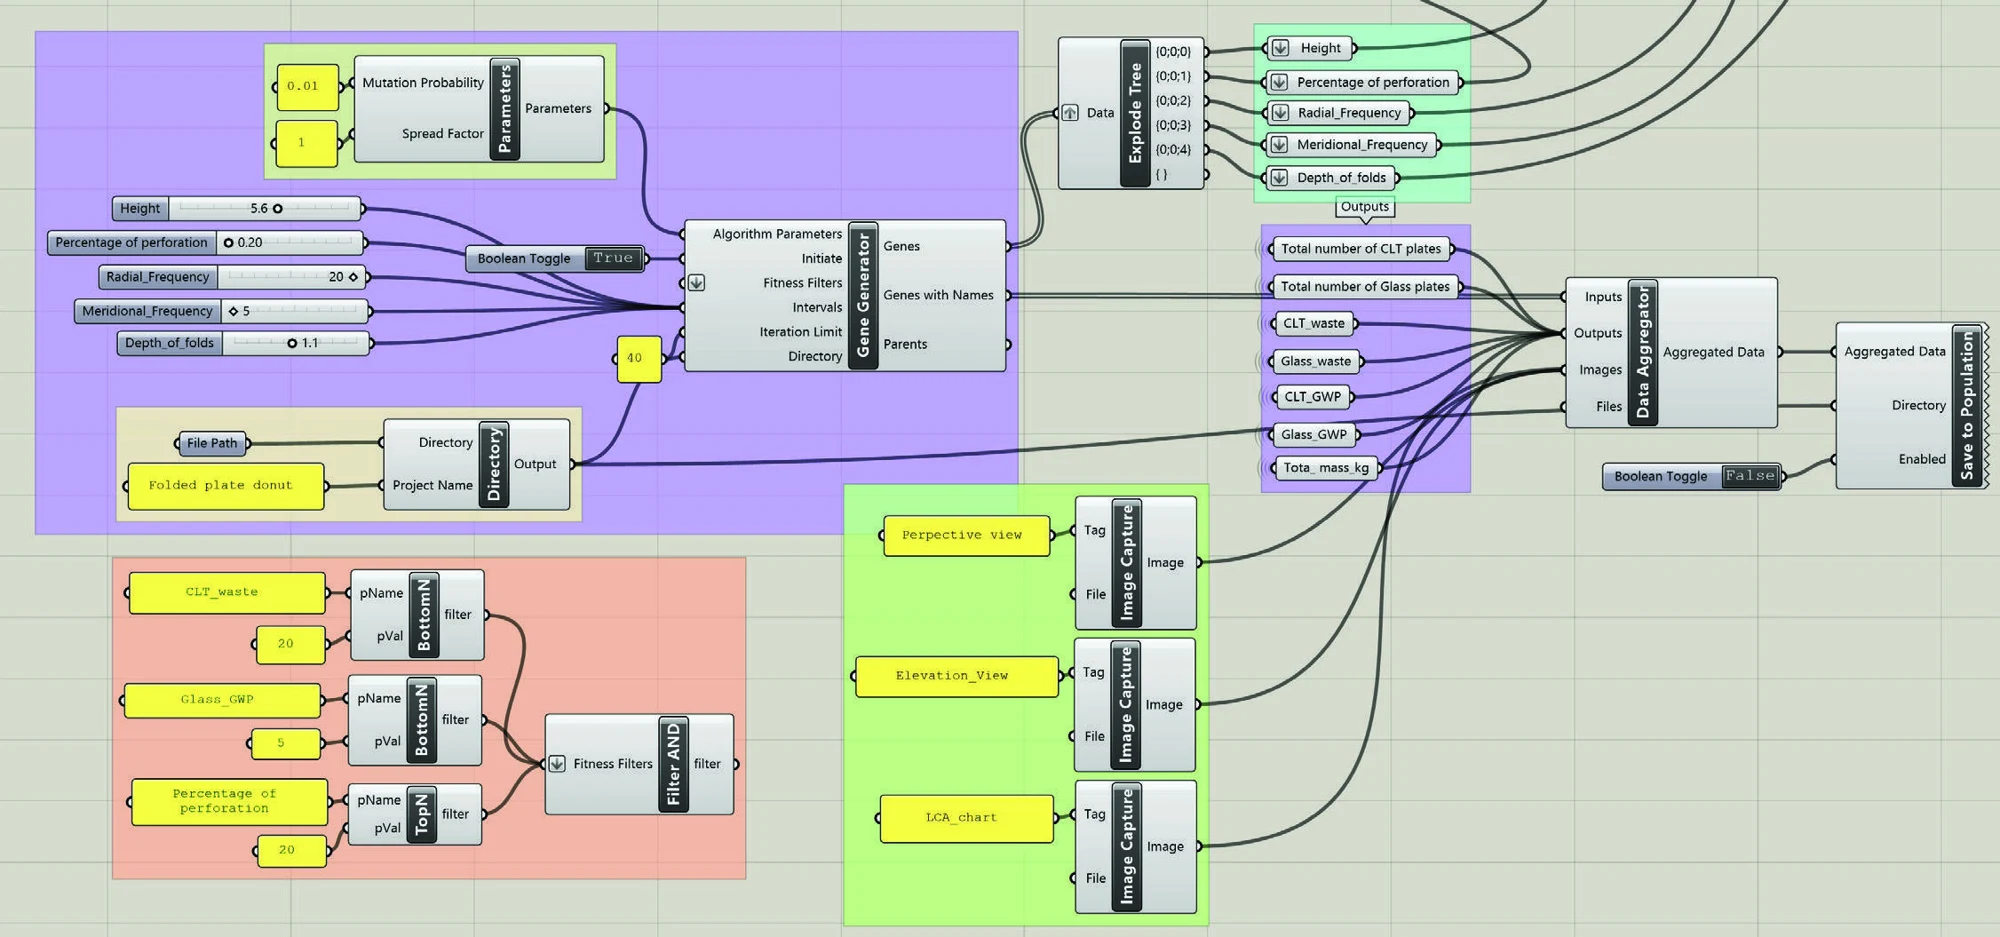
Connect actual number sliders directly to Intervals. Their nicknames become parameter names; their settings define the range and precision. Do not substitute a Panel or generic numeric list for these connections.
4. Capture the shape and the numbers
Add an Image Capture component for each view you want to save. Give it a tag, select a Rhino viewport from its right-click menu, and connect its Image output to Data Aggregator. Multiple tagged captures let you preserve, for example, an isometric view and a deformation view of the same alternative.
The optional File input lets Image Capture use an existing image file. Save your Grasshopper definition to retain viewport selections. Viewport images are captured after the Grasshopper solution completes so they correspond to the finished solution.
For numerical results, use named Data components or clearly named output parameters and supply one number per recorded output. For textual results, connect named Panel outputs to the optional Files input. Morpho stores their text in per-solution files. Images and files are optional; the data collection can begin with inputs and numerical outputs alone.
5. Initial population generation
Set a small Iteration Limit, enable Save to Population, and set Gene Generator’s Initiate to true. With no fitness filter, Morpho samples new values within the slider-defined intervals. Each recorded alternative receives an ID within the connected project.
Mutation Probability is the chance of randomly producing a gene. Spread Factor controls how far a child value can extend beyond its parents: at zero it stays between the parent values; higher values broaden the range, within the input bounds. Both controls accept values from 0 to 1.
Disable saving before rewiring the definition or changing its structure. Use a new project name when starting a study with a different set of input parameters.
6. Parent selection and subsequent runs
Open the Visualizer, compare alternatives and note the IDs of promising solutions. Use Filter ID for direct selection, comparison filters for numerical criteria, or Filter Expression for a typed rule. Connect the result to Fitness Filters on Gene Generator. Its Parents output reports the eligible IDs.
ID IN (46, 73) AND Weight < 40000
This example keeps either selected ID only if its recorded Weight is below 40000. Replace the sample names and limits with your own. Generate another batch, review it, and revise your selection. Existing saved alternatives remain available to revisit as your design priorities develop.
Separate Filter ID selections are pooled into one parent list. Other directly connected fitness conditions use AND. Use Filter OR when any of several conditions may qualify a solution. A typed expression uses ordinary Boolean logic: ID = 46 AND ID = 73 cannot match a single solution; use OR or IN.
A valid filter with no matching saved solution produces random parameters. An invalid rule stops generation and reports an error. Check the Parents output and component messages before interpreting a new run.
Explore the complete filter language ↗7. Know what your project saves
- solutions.db
- The local SQLite database that stores solutions and supports parent selection.
- solutions.csv
- A spreadsheet-readable export containing IDs, project names, inputs and outputs. It is rebuilt from the database after a save.
- solutions.csv.bak
- The previous CSV copy. This is not a substitute for backing up the full project folder.
- Tagged image and text folders
- Per-solution media connected to records by solution IDs. Keep these together with the project data.
IDs are numbered within each project. Use the actual ID field when matching images to records; do not infer IDs from a spreadsheet row number. Manual edits to the generated CSV are replaced on the next save.
The core exploration workflow stores its data locally and does not require a Morpho cloud account. If you want to share a study, make an intentional copy of the relevant project data and media.
8. Diagnostic observations
- No parents appear
- Check the project name, exact parameter names, existing solution IDs and filter bounds. Valid rules with no matches fall back to random generation.
- A filter reports an error
- Inspect the component message and Filter Expression’s “Parsed as” output. Check brackets, operators and numerical values. Use a dot as the decimal separator.
- Images are missing or out of date
- Check the selected viewport, image tag and optional file path. Keep image files and folders accessible. Save the Grasshopper definition after choosing a viewport.
- The browser viewer stops updating
- Keep the Morpho Visualizer window open. Connect the same Directory used for saving, and set Show to true. See the viewer launch guide.
- The Morpho tab does not appear
- Confirm the correct Rhino version was selected. Check for an older duplicate in Grasshopper’s Libraries folder and follow the supplied manual installation instructions.
To uninstall, use Rhino’s PackageManager, choose Morpho, select Uninstall and restart Rhino. Keep project folders separately if you want to retain your studies.
This guide describes the current 2.1.0 source and packaged installation instructions. The 35-page Morpho 2.0 User Manual provides illustrated background and examples.